These days, the visual appeal has one of the biggest impacts on users’ minds, especially when it comes to eCommerce stores. In this case, adding a product slider on your WooCommerce site will help you to highlight all the high resolution and beautiful images of your products in a cool slideshow.
All thanks to the product slider plugins, which will help you showcase as many WooCommerce product images as you want on a single page, even with a beautiful look. But, do you know how to build a WooCommerce product slider using a plugin?
Well, we will show you how can you build a product slider for your WooCommerce store using a simple yet really powerful plugin. So, let’s get started.
Why Product Slider for WooCommerce?
If you have an eCommerce site, you must have a large product catalog. Often, it becomes harder for your customers to find what they are actually looking for. You need to make your products communicate with your potential customers properly. This is where product sliders come in handy.
It is the perfect way to display multiple WooCommerce products as a slider on the product page. Product sliders help users to browse products easily as well as quickly. For example, you can-
- Display items across various categories in a slider
- Show off images of an item on its product page
- Display random or related items on a product page
This way, you can improve the visibility of your products on the site, which results in improving your SEO performance also. Using a product slider helps to gain more impressions and click-through rates. And when you get a high click-through rate, it will automatically improve your site’s conversion rate.
How to Build a WooCommerce Product Slider Using a Plugin?
 Using the right plugin, you can conveniently build attention-grabbing product sliders for your WooCommerce products. You will find several plugins to add sliders to our site. But for your eCommerce store, you need something compatible with WooCommerce that comes with advanced features to work effectively.
Keeping that in mind, we have found a perfect plugin called the WooCommerce Product Slider plugin. It is perfect for displaying your upsell, cross-sell, related and category products in slider and carousel.
So, let’s find out how to build a WooCommerce product slider using a plugin.
Step 1: Install and Activate the WooCommerce Product Slider plugin
The first and the most obvious thing is that you need to install and activate the plugin to get started with adding product sliders and carousels to your WooCommerce store. So, to install the plugin, you need to –
- Log in to your WordPress dashboard.
- Go to the Plugins menu and click on Add New.
- Type “WooCommerce product slider” in the search bar.
- Once you’ve got the plugin, simply install and activate it.
So, you are done with the installation process, and now you’re all set to add the product slider and carousel. As soon as you install and activate the plugin, you will see a new product slider tab appear on your WordPress dashboard. But we will go into that later.
Step 2: Add New Product Slider Carousel
Now, move forward to create a slider, and it will be super easy and fast with this plugin. To add a product slider carousel on your website, first, you need to generate a slider shortcode. And to do this, follow the following steps-
- Navigate to the Product Slider menu from your WordPress dashboard.
- Select Add New menu from the dropdown options.
- Now, give a title into the Add Title bar. It will be used as a section title for your slider.

- Then, select specific products and make changes if you want.
- Now, publish the post, and it will generate a shortcode in the bottom area.
- Lastly, copy the shortcode and then navigate to Pages > Add New.
- Select the (+) button from this page
- Click the shortcode option from the dropdown box and paste the shortcode. You can place the shortcode anywhere on your site’s post or page.
- Lastly, click publish, and you can see the changes after clicking the View Page option.
Step 3: Add Related Product

- Again, go to Product Slider > Settings > related.
- Turn the Related Product Slider button on.
- Make additional changes if required and finally click on save, and it’s done.
Step 4: Add Cross-Sell and Upsell Products
First, navigate to Product > All Product from your WordPress dashboard.
After that, select the product type from all the product lists. Then, choose the Linked Product Button from the newly appeared page and keep choosing your preferred product for Upsell and cross-sell. Lastly, hit the Update button.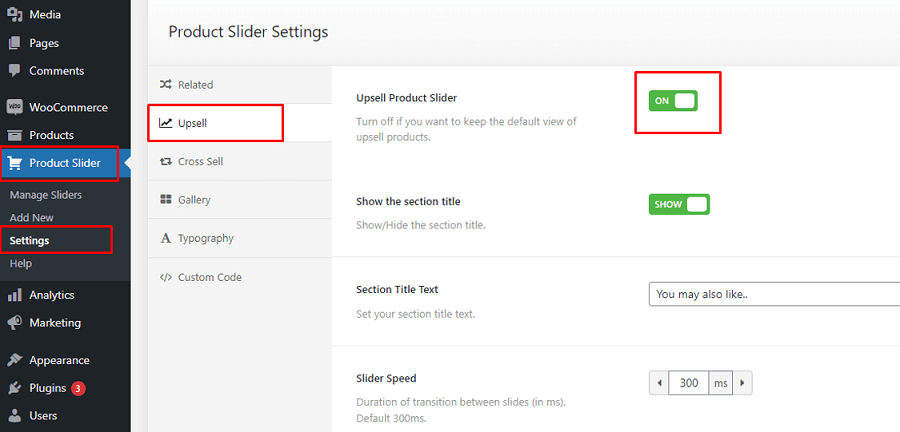
Then set the Upsell products by clicking on Product Slider > Settings menu > Upsell. Then turn the Upsell Product Slider on and save the changes.
Next, from the same Product Slider Setting page, select the Cross-sell menu. Lastly, turn the Cross-Sell Product Slider on and click on Save.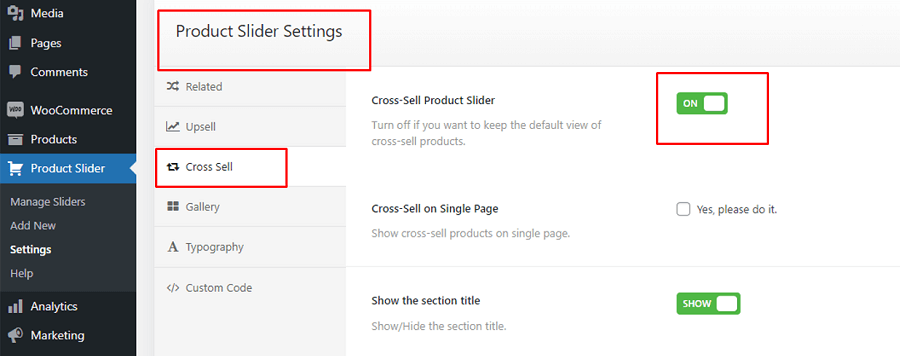
Step 5: Add Gallery Slider
Just like before, navigate to product slider > click settings > choose Gallery. Then turn on the Product Gallery Slider button and save the changes. After that, follow the following steps-
- Select Products Menu and click on the edit option.
- Then scroll down to the bottom of the page and select Add product gallery images to add your WooCommerce product images.
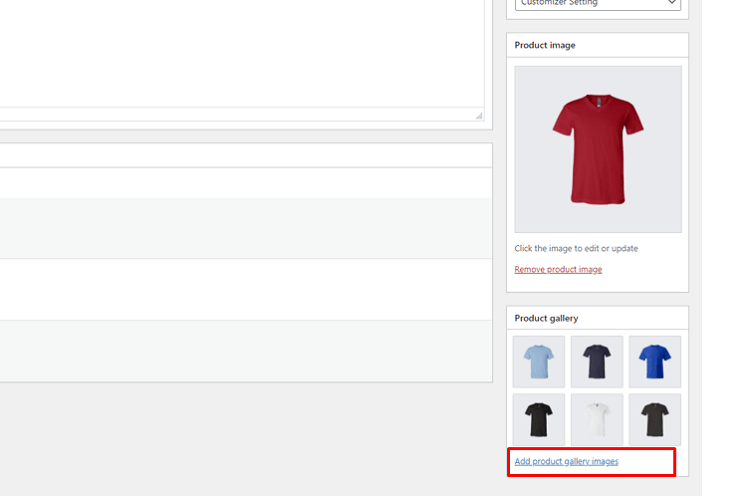
- Lastly, update the changes.
Step 6: Add WooCommerce Products to The Carousel
The simplest and easiest way to add WooCommerce products is to navigate to the Product slider plugin, make changes if you want, and save the changes. Once saved, it will automatically add a carousel to your product slider.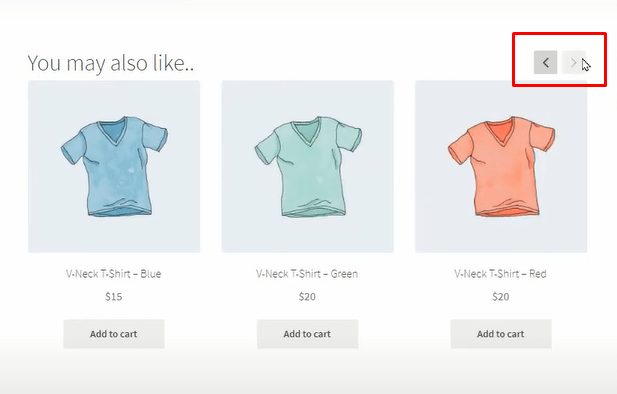
Step 7: Add Custom Code
If you want to add a slider using custom code, this useful plugin will also allow it. All you need to do is, go to the settings option by clicking the product slider menu from the WordPress dashboard. After that, select the custom code option and simply place your additional CSS and JS on a specific editor box. Save the changes, and it’s done.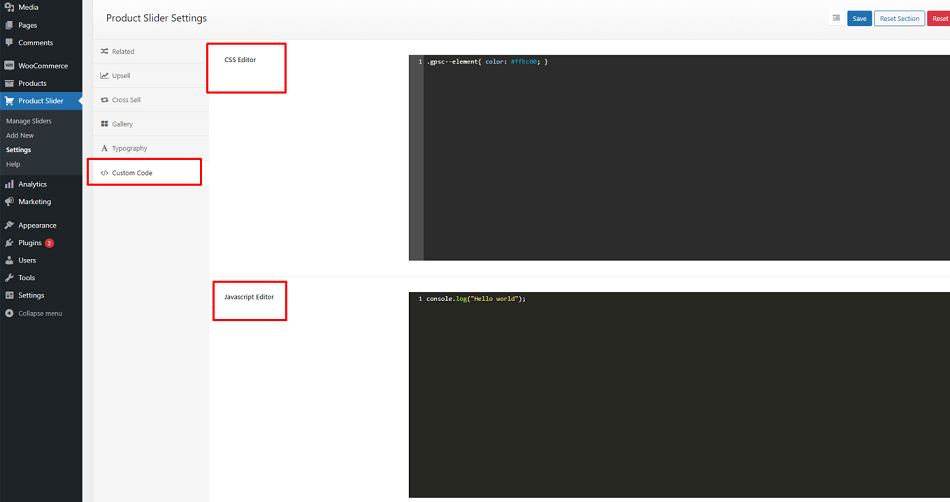
The WooCommerce Product Slider plugin has some additional customization options on its typography section. You can see this documentation to learn more about this plugin.
How Does the Product Slider Look Like?
Once done with all the above changes, you can see the following outcome on your WooCommerce product page.
Summing Up
It may look really simple when you see product sliders, but you can add a lot of functionalities to make it more attractive to the users. For example, transition effects, customized styles, designs, typography, and many more.
Fortunately, with the WooCommerce Product Slider plugin, you can conveniently work on both style and functionality as well as more control. In this guide, we have shared how to build a WooCommerce product slider using a plugin. Hopefully, it will help you to build WooCommerce product sliders easily.
If you have any questions regarding this topic, you can let us know by commenting below. Also, if you are already using a product slider on your online store, feel free to share your experience with us.
I’m Nazmul, a Technical SEO specialist dedicated to helping clients optimize every aspect of their search performance. My expertise covers the full range of technical SEO needs, from enhancing website structures to staying on top of the latest search engine developments. My passion for the technical side of SEO ignited early in my digital marketing career and has only grown over time. With each project, my skills have expanded—starting in agencies and now working hands-on within SEO tools to deliver impactful solutions for clients.


Leave a Reply